Showing posts with label Window Hacking. Show all posts

WINDOWS CRACK: WINDOWS 8 LOGIN PASSWORD HACK


Microsoft new big thing windows 8 said to the most secure operating system ever created by the Microsoft, by adding bulk of new tools and features. Despite of this we can crack windows password without any 3rd party tool. Although there are many tools available in the market to reset password but we will tell you the easier way and it take only ten using built in trouble shoot tools and some few directives of command prompt.


THE TRICK:

The trick was found Reboot.pro user Jamal Naji. We will discuss the trick how to do reset password in details.Windows crack comes down to just replacing the Ease of Access centre app (this process is called utilman.exe) with another copy of a Command Prompt file (cmd.exe).

When you able to swap the System Recovery and rebooted, Windows 8 logins screen will be seen again. On login screen click the Ease of Access button shows on the bottom-left corner of the screen. When you click the Ease of Access button command prompt window will open,the command prompt has full admin privilege,means that will grant you full access to edit or modify many things like other users’ passwords.Reboot and restore both exe file to their previous states and With in ten minutes you crack windows which is the most secure windows of Microsoft to date said by the Microsoft vice president during media breifing about windows 8.

This windows crack is not only work with windows 8 but also work for windows 7,xp and other windows version.Surprisingly Microsoft did not create any patch to secure this security hole until now.


Read more

Hard Disk Drive Setup - Partition and Format


This procedure explains how to setup a new hard disk. Warning - if you are setting up a hard disk which contains data, the following procedure would completely erase your hard disk and the data would be unrecoverable.

Before a new hard disk can be used it needs to be setup. This involves partitioning and formatting the hard disk. Windows 98 or ME boot disk contains the required software to perform this procedure. FDISK.EXE and FORMAT.COM are the files required in your bootable floppy disk. Start the partition and format procedure by booting your PC using a Windows boot disk. Make sure you set the BIOS so that the boot sequence is set to detect the floppy disk first. If your system has no problems booting you will be presented with a Windows boot disk menu. This gives you the option to start the system with or without CD-ROM support. At this stage you do not need the CD-ROM support, so choose the option to boot without CD-ROM support. You should end up in the MS DOS prompt A: (A drive). From A: command prompt type fdisk. You will be presented with following message:


Choose "Y" to enable large disk support.You will now be presented with the FDISK main menu as shown below.


From the menu, choose option 1 - Create DOS partition or Logical DOS drive. Another menu will present the following options.


Choose option 1 - Create primary DOS Partition. FDISK verifies the integrity of your drive and will ask you if want to use the maximum available size of your hard disk to create the primary partition and set it active. To keep things simple we will create one large partition. Choose "Y" to use maximum available space. When the partition has been created successfully you will be notified by the system. Your drive is now known as C: (C drive). Press "Esc" to return to the menu. Press "Esc" again to exit FDISK. You need to restart your system for the changes to take affect. Leave boot disk in the drive.When the system reboots, choose start without CD-ROM from the boot disk menu. While booting from floppy disk you might get error message like "Invalid media type reading drive C" this is OK for this stage as the hard disk is not formatted.

From A: command prompt type format c:You will get a message saying "WARNING, ALL DATA ON NON-REMOVABLE DISK DRIVE C: WILL BE LOST. Proceed with Format (Y/N)?".

Don't worry about the message as you do not have any data in the new hard disk. Choose "Y". The format will proceed and would show you a progress indicator. The time it takes to format a hard disk depends on the size and speed of the drive. This could be around 5-30 minutes. Once the format is complete you need to reset your system. You are now ready to install an operating system.
Read more

Windows 9 and Windows 10 Details Leaked


Windows 8.1 is just around the corner, but details on the next full Windows releases have already started reaching the web, proving that Microsoft has indeed started work on the upcoming iterations of its operating system.


Ru-Board forum member WZOR, who previously revealed fairly accurate information on new Microsoft products, now claims that Microsoft is already developing Windows 9 and Windows 10 and it’s looking into a wide array of major changes.

First of all, Windows 9, the first successor of the existing Windows 8 modern OS, is expected to hit the market sometime next year, but it won’t bring major visual updates to the existing platform. The good news is that Microsoft is working to bring back the Aero interface, but with “some” changes.

Previous reports indicated that Windows 9 could arrive as soon as November 2014, with the first beta to be launched in January next year. RTM is projected for mid-2014.

As far as Windows 10 is concerned, Microsoft is apparently planning lots of updates, some of which could move the operating system closer to the cloud environment.

Windows 10 could be Microsoft’s first cloud operating system that would allow users to access their desktops from basically any device and computer out there, as long as they’re connected to the Internet. The first concept is expected to be unveiled next month, so more details are likely to be revealed at that time, WZOR explains.

The future of Windows RT is also under consideration right now, with the same source claiming that Microsoft might actually merge RT and Windows Phone. This isn't the first time when such info makes the rounds, so there really might be some truth behind these words.

Of course, it’s a lot too early to talk about either Windows 9 or Windows 10, so let’s take all of these with a pinch of salt. Since Microsoft is still looking for a leader, many more changes are likely to occur until the next OS goes live.
Read more

Install Microsoft .NET Framework 3.5 Offline In Windows 8 Without Internet Connection


Now-a-days almost all 3rd party software/apps require Microsoft .NET Framework installed in your system. The required .NET Framework version might be different for different software and the most required .NET Framework version is 3.5 which comes preinstalled in Windows 7.

Today in this tutorial, we'll tell you how to install .NET Framework 3.5 in Windows 8 without any need of Internet connection. You can install it offline with the help of a single command. This method requires Windows 8 setup disc or ISO file so make sure you have Windows 8 setup files with you.

1. First you'll need to copy Windows 8 setup files to your hard disk. If you have Windows 8 setup ISO copied in your system, you can mount it on Virtual Drive by right-click on the iso file and select "Mount" option with the help of Power iso or Daemon Tools or you can extract its content using 7-Zip or winrar.

*If you have Windows 8 setup disc and don't want to copy its content, its ok. Just insert the disc in your CD/DVD drive so that Windows can access its content.

2. Now open Command Promt as Administrator and then provide following command:

Dism /online /enable-feature /featurename:NetFx3 /All /Source:F:\sources\sxs /LimitAccess

Here "F:" represents the CD/DVD drive letter in your system which contains Windows 8 setup disc. replace it with the correct drive letter according to your system.

If you extracted Windows 8 setup files in a directory, replace F:\sources\sxs with the correct path.

3. As soon as you execute the above mentioned command, Windows will start installing.NET Framework 3.5 in your system and it'll not require Internet connection.


It'll take a few minutes and you'll get a message that the operation completed successfully.

4. That's it. Now you have installed .NET Framework 3.5 in Windows 8 without using Internet/Web connection.
Read more

Best Password Hacking Breaking Tools


Hello Friends , Today I am sharing with you my latest Collection of "Best Password Hacking Tools 2011". Using this password hacking kit you will be able to crack a lot of passwords like Windows Admin password, pdf passwords, zip files passwords, document passwords, rar passwords and much more.. I am sure you will like this post.


This Password Hacking Kit Consists of following Password Hacking Breaking Tools:
1. PDF Password Remover
2. Windows XP Admin Password Remover
3. Zip File Password Cracker.
4. SQL Password Remover
5. Microsoft Office Password Remover.
6. Microsoft Windows Vista Password Remover.
7. Rar File Password Cracker
8. Windows Password Recovery Kit
9. Password Changer.
10. Distributed File Password Recovery..
and much more..


As the name of the tools suggests its a complete password hacking Kit. So guys Enjoy Latest Hacking tools ..


How to Use it??

1. Download the Password Hacking Kit From Below:
DOWNLOAD

2. Extract the file and Install it.

3. Then Register them and use it. ( all tools contains Full serial keys and patches).
Read more

The top 10 password breakers/crackers for Windows/Linux


This post helps you to unlock rar,iso files password for free.....

The best password crackers. The list made from all password brealkers from all over the globe including versions from unix and widnows as well.


1. Cain and Abel :
The top password recovery tool for Windows

UNIX users often smugly assert that the best free security tools support their platform first, and Windows ports are often an afterthought. They are usually right, but Cain & Abel is a glaring exception. This Windows-only password recovery tool handles an enormous variety of tasks. It can recover passwords by sniffing the network, cracking encrypted passwords using Dictionary, Brute-Force and Cryptanalysis attacks, recording VoIP conversations, decoding scrambled passwords, revealing password boxes, uncovering cached passwords and analyzing routing protocols.


2. John the Ripper :
A powerful, flexible, and fast multi-platform password hash cracker

John the Ripper is a fast password cracker, currently available for many flavors of Unix (11 are officially supported, not counting different architectures), DOS, Win32, BeOS, and OpenVMS. Its primary purpose is to detect weak Unix passwords. It supports several crypt(3) password hash types which are most commonly found on various Unix flavors, as well as Kerberos AFS and Windows NT/2000/XP LM hashes


3. THC Hydra :
A Fast network authentication cracker which support many different services

When you need to brute force crack a remote authentication service, Hydra is often the tool of choice. It can perform rapid dictionary attacks against more then 30 protocols, including telnet, ftp, http, https, smb, several databases, and much more


4. Aircrack :
The fastest available WEP/WPA cracking tool

Aircrack is a suite of tools for 802.11a/b/g WEP and WPA cracking. It can recover a 40 through 512-bit WEP key once enough encrypted packets have been gathered. It can also attack WPA 1 or 2 networks using advanced cryptographic methods or by brute force. The suite includes airodump (an 802.11 packet capture program), aireplay (an 802.11 packet injection program), aircrack (static WEP and WPA-PSK cracking), and airdecap (decrypts WEP/WPA capture files)


5. L0phtcrack :
Windows password auditing and recovery application

L0phtCrack, also known as LC5, attempts to crack Windows passwords from hashes which it can obtain (given proper access) from stand-alone Windows NT/2000 workstations, networked servers, primary domain controllers, or Active Directory. In some cases it can sniff the hashes off the wire. It also has numerous methods of generating password guesses (dictionary, brute force, etc). LC5 was discontinued by Symantec in 2006, but you can still find the LC5 installer floating around. The free trial only lasts 15 days, and Symantec won't sell you a key, so you'll either have to cease using it or find a key generator. Since it is no longer maintained, you are probably better off trying Cain and Abel, John the Ripper, or Ophcrack instead.


6. Airsnort :
802.11 WEP Encryption Cracking Tool

AirSnort is a wireless LAN (WLAN) tool that recovers encryption keys. It was developed by the Shmoo Group and operates by passively monitoring transmissions, computing the encryption key when enough packets have been gathered. You may also be interested in the similar Aircrack.


7. SolarWinds :
A plethora of network discovery/monitoring/attack tools

SolarWinds has created and sells dozens of special-purpose tools targeted at systems administrators. Security-related tools include many network discovery scanners, an SNMP brute-force cracker, router password decryption, a TCP connection reset program, one of the fastest and easiest router config download/upload applications available and more.


8. Pwdump :
A window password recovery tool

Pwdump is able to extract NTLM and LanMan hashes from a Windows target, regardless of whether Syskey is enabled. It is also capable of displaying password histories if they are available. It outputs the data in L0phtcrack-compatible form, and can write to an output file.


9. RainbowCrack :

An Innovative Password Hash Cracker

The RainbowCrack tool is a hash cracker that makes use of a large-scale time-memory trade-off. A traditional brute force cracker tries all possible plaintexts one by one, which can be time consuming for complex passwords. RainbowCrack uses a time-memory trade-off to do all the cracking-time computation in advance and store the results in so-called "rainbow tables". It does take a long time to precompute the tables but RainbowCrack can be hundreds of times faster than a brute force cracker once the precomputation is finished.


10. Brutus :
A network brute-force authentication cracker

This Windows-only cracker bangs against network services of remote systems trying to guess passwords by using a dictionary and permutations thereof. It supports HTTP, POP3, FTP, SMB, TELNET, IMAP, NTP, and more. No source code is available. UNIX users should take a look at THC Hydra.


------------------------------------------------------------------------------------------------------------
------------------------------------------------------------------------------------------------------------
Read more

Windows XP Shortcuts Keys


ALT+- (ALT+hyphen) Displays the Multiple Document Interface (MDI) child window's System menu ALT+ENTER View properties for the selected item

ALT+ESC Cycle through items in the order they were opened ALT+F4 Close the active item, or quit the active program
ALT+SPACEBAR Display the System menu for the active window
ALT+TAB Switch between open items
ALT+Underlined letter Display the corresponding menu
BACKSPACE View the folder one level up in My Computer or Windows Explorer


CTRL+A Select all
CTRL+B Bold
CTRL+C Copy
CTRL+I Italics
CTRL+O Open an item
CTRL+U Underline
CTRL+V Paste
CTRL+X Cut
CTRL+Z Undo
CTRL+F4 Close the active document
CTRL while dragging Copy selected item
CTRL+SHIFT while dragging Create shortcut to selected iteM
CTRL+RIGHT ARROW Move the insertion point to the beginning of the next word


CTRL+LEFT ARROW Move the insertion point to the beginning of the previous word


CTRL+DOWN ARROW Move the insertion point to the beginning of the next paragraph


CTRL+UP ARROW Move the insertion point to the beginning of the previous paragraph


SHIFT+DELETE Delete selected item permanently without placing the item in the Recycle Bin


ESC Cancel the current task
F1 Displays Help
F2 Rename selected item
F3 Search for a file or folder
F4 Display the Address bar list in My Computer or Windows Explorer
F5 Refresh the active window
F6 Cycle through screen elements in a window or on the desktop
F10 Activate the menu bar in the active program
SHIFT+F10 Display the shortcut menu for the selected item
CTRL+ESC Display the Start menu
SHIFT+CTRL+ESC Launches Task Manager
SHIFT when you insert a CD Prevent the CD from automatically playing


WIN Display or hide the Start menu
WIN+BREAK Display the System Properties dialog box
WIN+D Minimizes all Windows and shows the Desktop
WIN+E Open Windows Explorer
WIN+F Search for a file or folder
WIN+F+CTRL Search for computers
WIN+L Locks the desktop
WIN+M Minimize or restore all windows
WIN+R Open the Run dialog box
WIN+TAB Switch between open items


HIdden Run Commands


Hidden Bluetooth software in windowsXp:
>START
>RUN
>FSQUIRT

Restoring a Lost Desktop-


>Start
>Run
Type a period " . "
Then press Enter

R You Playing Game In Ur pc?


Want To Do It Advance?
Try This Trick
GoTo
-run
-type joy.cpl
DONE!

If ur PC is hanged then do this.


Press shift+ctrl+esc
n den click on 'END TASK'
ur PC is runing now


create folder without name
>select any folder
>rename it
>press alt & type 0160
>enter


Amazing trick for use

Windows Backup Utility if installed
go to run
type ntbackup
ok
Now use backup


Disable CD Autorun


1) Click Start, Run and enter GPEDIT.MSC


2) Go to Computer Configuration, Administrative Templates, System.


3) Locate the entry for Turn autoplay off and modify it as you desire.


Remove the Recycle Bin from the Desktop


If you don't use the Recycle Bin to store deleted files , you can get rid of its desktop icon all together.


Run Regedit and go to:


HKEY_LOCAL_MACHINE/SOFTWARE/Microsoft/Windows/CurrentVersion/explorer/Desktop/NameSpace


Click on the "Recycle Bin" string in the right hand pane. Hit Del, click OK.


Hide 'User Accounts' from users
Go to Start/Run, and type:


GPEDIT.MSC


Open the path


User Config > Admin Templates > Control Panel


doubleclick "Hide specified Control Panel applets"


put a dot in 'enabled', then click 'Show"


click Add button,


type "nusrmgt.cpl" into the add box


Turn off Welcome screen


Open User Accounts in Control Panel.


Click Change the way users log on or off
Read more

How To Add Copy To & Skip Welcome Screen


Add new 'Copy to' key


  • Add a 'Copy to folder' option to the right-click context menu so that you can quickly copy a file by right-clicking it. 
  • In the Registry Editor, browse to 'HKEY_CLASSES_ROOT\AllFilesystemObjects\shellex\ContextMenuHandlers' and create a new key called 'Copy to'. Change its default value to '{C2FBB630-2971-11d1-A18C-00C04FD75D13}' and check it works in Windows.
  • You can also add a 'Move to folder' option in this way. From the same 'ContextMenuHandlers' key, simply create a new key called 'Move to' and then change its default value to '{C2FBB631-2971-11d1-A18C-00C04FD75D13}' to do this. 

Skip welcome screen


  • You can choose to log into Windows automatically and bypass the welcome screen by making a simple tweak. 
  • To do this, choose 'Start | Run' and enter control userpasswords2 into the 'Open' bar. Click 'OK' to see a dialog showing each user installed on the PC. 
  • Clear the box marked 'Users must enter a user name and password to use this computer'. Click 'OK'. Now restart your PC and you should go directly to your desktop.
Read more

How To Enable The Secret Feature "GODMODE" In Windows 8 Like Windows 7


Windows 7 users were delighted when they found out about a secret feature called GodMode. It basically lets you create a folder with a special name that somehow then gives you access to just about all of the controls, options and settings for the OS.

Luckily, you can enable GodMode in Windows 8 too! To get started, just create a folder on the desktop and name it whatever you like. After that, right-click and it and choose Rename. Now just add the following to the end of the folder name:


.{ED7BA470-8E54-465E-825C-99712043E01C}

As you can see, you need to include the . before the opening bracket. Here’s my mine looks like:


All Settings.{ED7BA470-8E54-465E-825C-99712043E01C}


When you do this, the icon on the folder changes into one that is exactly the same as the Control Panel.


However, if you click on the new GodMode icon, you’ll get a folder with a bunch of links to all kinds of settings on Windows 8. It’s nice because it even breaks it down by category.


Now you can access every single setting and option in Windows 8 from one folder! So if you are having a hard time finding a particular setting or control panel item, just open this folder and do a search. It’s great because you can narrow down the huge list by typing in a few keywords.


Sweet! So that’s how you enable GodMode in Windows 8. However, there is also another way to get access to a lot of settings in Windows 8. The new Start Screen has a built-in search option that lets you search all system settings. Go to the Start Screen and type in the word Settings.


You get a pretty big list of 91 settings you can adjust. Just swipe with your finger or scroll with your mouse to access all of the settings.


Pretty cool! So those are two ways you can make it easier to find system settings on Windows 8: GodMode and via the search option on the Charms bar. Enjoy!
Read more

How To Optimize Windows 8 In Old Hardware : Computer Solutions


Microsoft has made a point of advertising the performance enhancements and optimizations being made to Windows 8. Although Windows 7 was well received and typically offered better performance and stability than its much-maligned predecessor, Windows Vista, Microsoft had some loftier goals in mind for the jump to Windows 8.
Although it’s too early to confirm that Microsoft has achieved all of their goals, it appears they're on the right track. Windows 8 has generally been an improvement over Windows 7 on the few systems we've installed the RTM release on: they boot up and shut down quicker, for example, and overall performance seems faster. This makes sense, because the new OS is built to boot and shut down faster than previous editions, use less memory and disk space, consume fewer combined processor and GPU resources, and accommodate a wider range of devices and screen sizes.
The Windows 8 file manager, task manager, and even the setup process itself has been optimized; the ultimate goal for these improvements is to enhance performance and minimize resource consumption, which in turn would lower power consumption and potentially improve battery life on laptops, tablets and other mobile devices. So while it's not terribly expensive to build a new PC tuned for Windows 8 (check out our guide to building a speedy Windows 8 PC for under $500) you might want to try installing it on your old PC first and implementing a few of the tricks and tweaks we've learned from testing Microsoft's latest operating system.
Although Windows 8 is Microsoft’s latest operating system, its minimum requirements aren’t much higher than the ancient Windows Vista.While Windows 8 is designed to be installed on cutting edge technology, it was also engineered to work well on lower-performing hardware. In fact, Windows 8’s system requirements are barely any higher than Windows Vista’s, which was released almost six years ago.

According to Microsoft, Window 8’s hardware requirements are:

Processor: 1 gigahertz (GHz) or faster
RAM: 1 gigabyte (GB) (32-bit) or 2 GB (64-bit)
Disk space: 16 GB (32-bit) or 20 GB (64-bit)
Graphics card: Microsoft DirectX 9 graphics device with WDDM driver If you’d like to take advantage of some of Windows 8’s ancillary features and capabilities, these additional items will also be required:

To use touch, you’ll need a tablet or a monitor that supports multi-touch.
To access the Windows Store to download and run apps, you need an active Internet connection and a screen resolution of at least 1024 x 768.
To snap apps, you need a screen resolution of at least 1366 x 768.
Internet access (ISP fees might apply) With that said, Windows 8 should still install and run on some systems that don’t meet these requirements. To test that theory we installed it on an ancient Asus Eee PC 900, which is powered by a lowly, single-core Intel Celeron M 900MHz CPU and paltry integrated Intel 915GM graphics. The Eee PC 900 system had been updated with 2GB of memory and a 64GB solid state drive, though.

ASUS 
The underpowered Asus EEE PC 900 netbook is almost five years old, but it can still run Windows 8 pretty smoothly with a few tweaks.As you probably suspect, Windows 8’s performance isn’t stellar on a machine with such meager specifications, but the OS was surprisingly smooth. It wasn’t until the system was taxed with a handful of running applications and multiple open browser windows that things significantly slowed. We managed to remedy the situation with some tweaking and streamlining, and now we know enough to show you how you can optimize Windows 8 on an older PC.

New OS, new issues Before we dive into the actual Windows 8 tweaks we made to our low-end Eee PC, we should mention that it is exceedingly common (and dare we say expected) that any new operating system will have its fair share of bugs. As such, it is paramount that users looking to migrate and get the most out of Windows 8 download the latest patches for their software and install the latest drivers for their hardware.
Although nearly any component or device that works with Windows 7 should also work with Windows 8, there are low-level differences between the operating systems that could affect compatibility, stability, and performance. Keeping the OS patched and using the latest drivers available for Windows 8 will help ensure optimal performance and stability, so run Microsoft Update and seek out any new drivers available for your components right away.

Don't rely on Microsoft 
Microsoft may have made great strides in recent years to improve the reliability and performance of Windows, and the company does include some useful tools to help users maintain their systems, but there is always room for improvement. Many free third-party applications are more comprehensive and offer additional features than Microsoft’s built-in tools and the adaptive nature of a few of Windows’ features consume resources and can affect the user experience on slower hardware. Because of this, it’s often beneficial to replace or augment some of the tools built into Windows 8 and manually specify some settings to prevent the OS from having to manage them on the fly.

If you have a hard drive, the first thing we’d recommend is replacing Windows 8’s built-in disk defragmenter (do not use a disk defragmenter on a solid state drive). Windows 8’s built-in defrag utility isn’t bad, but there are a few free solutions out there that are much better. Defraggler, available for download at piriform.com, is a free replacement for Windows’ integrated disk defragmenter, and (because it does a more thorough job analyzing and remedying file fragments) drives defragmented with Defraggler can theoretically offer better performance. The real-world performance differences will be miniscule, but on older hardware every little bit counts. We’d suggest downloading and installing Defraggler immediately after installing the OS. Do a Disk Cleanup to free up some space, update the OS, and then run Defraggler to ensure the majority of the OS’ files are contiguous and that they are placed on the fastest part of your hard drive.
Another free tool available at piriform.com, CCleaner, can also come in handy when optimizing a system. Not only does CCleaner do a good job of augmenting Windows’ built-in Disk Cleanup utility to better clean out junk files and reclaim disk space, but it has easy-to-use options for cleaning out startup items too. On a fresh installation of Windows 8, the removal of unnecessary startup items is less important, but if you’re upgrading a system that’s already running an older version of Windows, all of the junk that’s polluted the original OS will migrate to the Windows 8 upgrade, so all of the unnecessary junk should be cleaned out.
Here's what we did for our aging Asus Eee PC: First, install Windows 8 to a freshly formatted drive. Next, update the OS and install any patches and drivers available from Microsoft Update. Check the websites of your major component manufacturers (your graphics card, monitor, etc.) and install the latest drivers, then download and install CCleaner from Piriform's website (mentioned earlier). If you're using a standard hard drive (not an SSD), you should also download and install Defraggler. Finally, run Windows’ built-in Disk Cleanup tool and CCleaner. If you have a hard drive run Defraggler and defrag the disk for optimum performance; we didn't need to do this since our eeePC is now running an SSD.


Make some changes
Disabling superfluous graphical effects in Windows 8 will minimize memory use and make the OS feel snappier.After installing the OS and cleaning up any junk leftover from the installation and update procedures, we move on to tweaking some of Windows 8’s settings to better suit our aged PC. Our first stop was the Advanced System Settings menu, where we can alter the OS’ virtual memory settings and visual options.To get to the Advanced System Settings in Windows 8, switch to Desktop mode, click the Libraries shortcut in the taskbar, and then right-click on Computer. In the resulting context menu, select Properties, and the System control panel will open. Click on Advanced System Settings in the left pane of the window and the System Propertiescontrol panel will open. Click on the Advanced tab, and then click on the Settings button in the Performance section at the top to open the Performance Options control panel. Once open, click on the Visual Effects tab at the top and then tick the "Adjust For Best Performance" option and hit Apply. If there is a particular visual effect you’d prefer to leave enabled, you can individually select it here, but the more options that are disabled the better your PC's performance will be.

While the Performance Options control panel is still open, click on the Advanced tab at the top and on the resulting menu click on the Change button in the Virtual Memory section.
Manually configuring virtual memory settings and specifying a set paging file size will prevent Windows from changing it on the fly.There’s lots of debate as to how to best configure Windows’ paging file, but unless you consistently run tons of applications a run out of physical and virtual memory, Microsoft’s recommended paging file size should be fine. The recommended size of the paging file is going to vary based on how much memory is installed in your system; in our Eee PC, which had 2GB of RAM, the recommended size for the paging file was 2039MB. By default, Windows will start with a smaller paging file and scale it up on the fly if necessary. By manually specifying the paging file size, Windows will no longer have to dynamically manage the file and the recommended amount will always be available.
To specify the paging file size in Windows 8, select the Custom Size: radio button in the middle of the Virtual Memory control panel and then input the recommended paging file size in megabytes (listed at the bottom of the window) in both the Initial Size and Maximum Size fields. Then click the Set button, click OK, and the click OK to close the Performance Options window. Click OK in the System Properties window as well, then restart the computer if necessary. However, as noted earlier, you really don't have to do this
Read more

Hack Windows Admin


--------------------------------------------------------------------------------------------------------
Today, i am going to show you many aspects of the Windows Password Storage path, Method of Encryption, and breaking into Windows by cracking the admin password. We need this often for many reasons:

1) Sometime we have forgotten our old password and Hint isn't helping out.
2) We want to break into someone computer to get the information.
3) Just want to take revenge from someone.
4) Stealing computer data.

Lets, take a deep dive in Cracking Windows password and also where these are stored and in which format.

SAM file and Password Hashes~Place where these passwords are stored in Hashes:
Password Hashes - When you type your password into a Windows NT, 2000, or XP login Windows Seven, Vista etc Windows encrypts your password using a specific encryption scheme that turns your password into something that looks like this:


7524248b4d2c9a9eadd3b435c51404eddc5

This is a password Hash. This is what is actually being checked against when you type your password in. It encrypts what you typed and bounces it against what is stored in the Registry and/or SAM File.


You can break this hash password from


www.md5hash.com


www.passcracking.ru


SAM File - Holds the user names and password hashes for every account on the local machine, or domain if it is a domain controller.

Location of SAM/Hashes:
You can find what you're looking for in several locations on a given machine.
It can be found on the hard drive in the folder %systemroot%system32config (i-eC:\windows\system32\config). However this folder is locked to all accounts including Administrator while the machine is running. The only account that can access the SAM file during operation is the "System" account.

The second location of the SAM or corresponding hashes can be found in the registry. It can be found under HKEY_LOCAL_MACHINESAM. This is also locked to all users, including Administrator, while the machine is in use.(GO to Run and Type Regedit and Hit enter, Now scroll to HKEY_LOCAL_MACHINESAM, However you may not access to it.)

So the two (Some other also) locations of the SAMHashes are:
- %systemroot%system32config
- In the registry under HKEY_LOCAL_MACHINESAMCracking or Breaking Into Admin Account:
How to get Hashes form SAM file?
Well, Below are the methods to do so:
1) Well, the easiest way to do this is to boot your target machine to an alternate OS likeNTFSDOS or Linux and just copy the SAM from the %systemroot%system32config folder.


It's quick, it's easy, and it's effective. You can get a copy of NTFSDOS from Sysinternals(http://www.sysinternals.com) The regular version of NTFSDOS is freeware, which is always nice, but only allows for Read-Only access. This should be fine for what you want to do, however, if you're the kind of person that just has to have total control and has some money to burn. NTFSDOS Pro, which is also by Sysinternals has read/write access but it'll cost you $299.

2) You can also get password hashes by using pwdump2 (Google It to get software ~ Search at openwall.com). pwdump uses .DLL injection in order to use the system account to view and get the password hashes stored in the registry. It then obtains the hashes from the registry and stores them in a handy little text file that you can then paste them into a password cracking utility like l0phtcrack or John the ripper (Linux Based works well) also cain and abel can be used.

3) Import Hashes directly from l0phtcrack, and let them open to you by cracking.


Obtained Hashes? Now crack them:
Well, as i have said that these can't be reversed but somehow automated famous cracking softwares can be used to achieve the target. Yes, it is possible, All we have to do is to have a bit patience. The software will use a lot of strings and will compare these hashes also, Inshort it will decode them.


1) John the Ripper - John the Ripper is to many, the old standby password cracker. It is command line which makes it nice if you're doing some scripting, and best of all it's free and in open source. The only real thing that JtR is lacking is the ability to launch Brute Force attacks against your password file. But look at it this way, even though it is only a dictionary cracker, that will probably be all you need. I would say that in my experience I can find about 85-90% of the passwords in a given file by using just a dictionary attack.

2) L0phtCrack - Probably the most wildly popular password cracker out there. L0phtCrack is sold by the folks at @Stake. And with a pricetag of $249 for a single user license it sure seems like every one owns it. This is probably the nicest password cracker you will ever see. With the ability to import hashes directly from the registry pwdump and dictionary, hybrid, and brute-force capabilities. No password should last long. Well, I shouldn't say "no password". But almost all will fall to L0phtCrack given enough time.

Making Your Own Password in Windows:
Injecting Password Hashes into the SAM:
Easiest ways to gain Administrator privileges on a machine, is by injecting your own password hashes into the SAM file. In order to do this you will need physical access to the machine and a brain larger than a peanut. Using a utility called "chntpw" by Petter Nordhal-Hagen you can inject whatever password you wish into the SAM file of any NT, 2000, or XP machine thereby giving you total control, just burn the .iso on a disk and use it. I would give a tip like backing up the SAM file first by using an alternate OS.Make a USB disk of linux or Windows Live dsik can also work. Go in, inject the password of your choosing. Login using your new password. Do what you need to do. Then restore the original SAM so that no one will know that i was hacked.
You need to have admin access to perform this change from the command line. This is an especially handy trick if you want to change a password on an account but you’ve forgotten the original (going through the Control Panel can require confirmation of the old password).
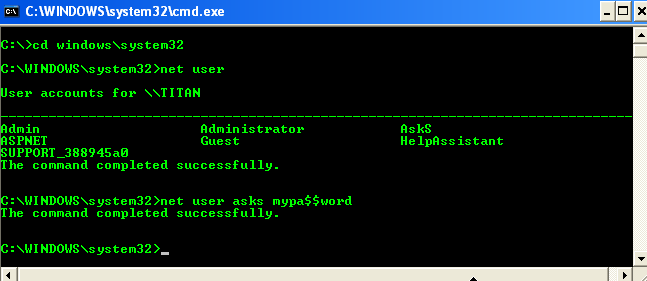
Now we hack Admin Password To verify the user name, by simply typing net user, I get a list of all the user names on that windows machine. Now, go to the command prompt and enter:
cd\ cd windows\system32
net user

If there are people near you and you don’t want them to see the password you type, enter:

net user *

E.g. > net user username *

> Type a password for the user:

> Confirm the password:


Another Easy method, Using ophcrack to Hack into Admin Account:Ophcrack is a Windows password cracker based on a time-memory trade-off using rainbow tables. This is a new variant of Hellman's original trade-off, with better performance. It recovers 99.9% of alphanumeric passwords in seconds.


This is a type of offline cracking, Just grab .iso of ophcrack from here. Burn it and enjoy using.
1. Opchrack can crack passwords for Windows 7, Windows Vista, and Windows XP.
2. Ophcrack can recover 99.9% of passwords from Windows XP, usually in a matter of seconds. Any 14-character or smaller password that uses any combination of numbers, small letters, and capital letters should be crackable.
3. Ophcrack can recover 99% of passwords from Windows 7 or Windows Vista. A dictionary attack is used in Windows 7 and Vista.
4. The Ophcrack LiveCD option allows for completely automatic password recovery.
5. LiveCD method requires no installation in Windows, making it a safe alternative to many other password recovery tools.
6. No Windows passwords need to be known to use the Ophcrack LiveCD to crack your Windows passwords.

Download

I think this ophcrack method is far better, Try this one just get a disk and write it, Or else USB disk can aslo be used.

Some security Tips ~ Making strong passwords:
Now, You might have come to know that how passwords can be cracked, So there are some tips for you.
1) Do not make common passwords like 123456 or the one of your own name.
2) Use @, *, # or other symbols in your passwords to ensure maximum security in this case John the ripper and Ophcrack and also other cracking tools may take long time, it will be frustrating for hacker.
3) Keep changing your password. So, that if long time is taken by one hash to decode, until it decodes you have generated another hash.

Read more

Window Hacking


>>Open COMMAND PROMPT while Locked by User.
>open notepad
>type www.command.com
> then save as cmd.bat at desktop
>then enter now its open.....enjoy

>>If your computer is slow?
then clean up the ram..>Open notepad
>type FREEMEM=SPACE(64000000)
>Save it as ram.vbs
now run the script.
Check out !!


>>CracK BIOS Password>Open the CPU
>Observe the Motherbord
>Remove the Silver Battery(3v)
>Wait 2 minutes and place the Battery
>>Restoring a Lost Desktop-
>Start
>Run
Type a period " . "
Then press Enter


>>If ur PC is hanged then do this.Press shift+ctrl+esc or ctrl+alt+del
n den click on 'END TASK'
ur PC is runing now

>>create folder without name>select any folder
>rename it
>press alt & type 0160 or 255
>enter

>>Amazing trick for useWindows Backup Utility if installed
go to run
type ntbackup
ok
Now use backup

>>Increase the speed of your file sharingSimple Way to Share Multiple Folders :
Goto Run and Type SHRPUBW.EXE then press Enter
Select the folder you want to share and Set permissions,
your share folder is ready now.....


>>Turning off the Help on Min, Max, Close IconsWhen the mouse goes over the minimize, maximize and close icons on the upper
right hand side of a window.

To disable that display:
1. Start Regedit
2. Go to HKEY_CURRENT_USER \ Control Panel \ Desktop
3. Create a String Value called MinMaxClose
4. Give it a value of 1
5. Reboot

>>FIX CORRUPTED FILE IN WINDOW XP1.Load XP cd into cd drive

2. go to Run

3. type sfc/scannowok

4. Then copy its lost file frm cd.

>>AUTO DELETE TEMPORARY FOLDER.!!what i prefer is %temp% " without quotes.. at Start -> Run.. this opens ur temp folder n den u cal erase it nearly
First go into gpedit.msc
Next select -> Computer Configuration/Administrative Templates/Windows Components/Terminal Services/Temporary Folder
Then right click "Do Not Delete Temp Folder Upon Exit"
Go to properties and hit disable. Now next time Windows puts a temp file in
that folder it will automatically delete it when its done! Note from Forum Admin: Remember, GPEDIT (Group Policy Editor) is only available in XP Pro.


>>Locking Folders:
Consider you want to lock a folder named XXXX in your E:\, whose path is E:\XXXX.
Now open the Notepad and type the following


[code]ren xxxx xxxx.{21EC2020-3AEA-1069-A2DD-08002B30309D}[/code]
Where xxxx is your folder name. Save the text file as loc.bat in the same drive.
Open another new notepad text file and type the following


[code]ren xxxx.{21EC2020-3AEA-1069-A2DD-08002B30309D} xxxx[/code]
Save the text file as key.bat in the same drive.


Steps to lock the folder:
To lock the xxxx folder, simply click the loc.bat and it will transform into control panel icon which is inaccessible.
To unlock the folder click the key.bat file. Thus the folder will be unlocked and the contents are accessible.


>>Locking Drives:


We don’t usually prefer to lock our drives, but sometimes it becomes nesscary. Say for instance you might have stored your office documents in D:\ and you don’t want your kids to access it, in such case this technique can be useful for you. Please don’t try this tweak with your root drive (usually C:\ is the root drive) since root drives are not intended to be locked because they are mandatory for the system and application programs.
Start & Run and type Regedit to open Registry editor
Browse HKEY_CURRENT_USER\Software\Microsoft\Windows\Curre ntVersion\Policies\Explorer
Create a new DWORD value NoViewOnDrive and set its value as


2^ (Alpha Number of Drive Letter-1) where Alpha number are simple counting of alphabets from A to Z as 1 - 26
For example: to lock C:\, Alpha number of C is 3 so 2^ (3-1) = 4 (decimal value)
To lock more drives, calculate the value of each drive and then set sum of those numbers as value
To unlock your drive just delete the key from the registry.

>>To Remove Recyle Bin From Your DesktopOpen Regedit by going to START - RUN and type Regedit and hit enter. Then you should navigate to following entry in registry HKEY_LOCAL_MACHINE\SOFTWARE\Microsoft\Windows\CurrentVersion\Explorer\ Desktop\NameSpace\{645FF040-5081-101B-9F08-00AA002F954E} and delete it. This action should remove recycle bin from your desktop.
>>Disable the Security Center warningsFollow the given steps to edit the computer registry for disable message:
First click on Start button then type Regedit in Run option.
Here locate the location to:
• HKEY_LOCAL_MACHINE\SOFTWARE\Microsoft\Security Center
Here in right side panel, double click on Anti Virus Disable Notify and set its value 1.
Now close the registry editor and restart your computer after any changes to go into effect.


>>HIDE DRIVES
How to Hide the drives(c:,d:,e:,a:...etc)

To disable the display of local or networked drives when you click My Computer.
1.Go to start->run.Type regedit.Now go to:

HKEY_CURRENT_USER\Software\Microsoft\Windows\CurrentVersion\Policies


\Explorer

2.In the right pane create a new DWORD item and name it NoDrives(it is case sensitive).

3.Modify it's value and set it to 3FFFFFF (Hexadecimal) .

4.Restart the computer.

5.Now when you click on My Computer, no drives will be shown(all gone...).

To enable display of drives in My Computer, simply delete this DWORD item that you created. Restart your computer. All the drives are back again.


>>Show your name in taskbarTrick to Show Your name after time in taskbar...
Try this trick to add up ur name in place of AM and PM beside time Its simple

Step-1:- Navigate to -> Start -> Control Pannel -> Regional and Language Option -> Click on Customize -> Go to TIME Tab -> Change AM symbol and PM symbol from AM and PM to ur name -> Apply -> Ok ...
Did It change? If not, follow step-2 below.

Step2:- Now go to time in taskbar and Double Click it to open "Date and time property" ...Look place where time changes in digital form i.e. 02:47:52 AM , click to arrow to change the AM or PM by selecting and press arrow. It will Show ur name or name that was entered by u, Apply -> OK
Done
Read more